เราสามารถทำให้คอมพิวเตอร์เราให้เป็น Web Server ง่ายๆได้แค่ดาวน์โหลด XAMPP มาติดตั้ง

XAMPP เป็นโปรแกรมฟรีแบบ open-source ที่ได้รวมสิ่งที่ทำให้คอมพิวเตอร์ของเราเป็น web server พัฒนาโดย Apache Friends โดยได้รวมโปรแกรม ต่างๆ คือ Apache (เว็บเซฟเวอร์) + MariaDB (ฐานข้อมูล) + PHP + Perl ซึ่งสามารถโหลดได้จาก www.apachefriends.org
วิธีการติดตั้ง xampp ดูได้จาก
https://www.ionos.com/digitalguide/server/tools/xampp-tutorial-create-your-own-local-test-server/
ติดตั้งไว้ที่ c:\xampp หลังจากติดตั้งเสร็จให้ กด start เพื่อเริ่มการทำงาน

Change Your MySQL Password Using the XAMPP Shell
Using the XAMPP shell is generally going to be the simplest and quickest method for changing your MySQL password. It does involve using the command line, which can seem daunting at first.
However, it’s actually fairly straightforward. This is also the method you’ll want to use if you’ve forgotten your existing MySQL password and need to reset it.
Note that these commands are the same whether you’re using Windows or macOS. Since this is a unique shell specific to XAMPP, any typical differences between the platforms won’t apply.
To get started, launch your XAMPP Control Panel and click on the Shell button on the right-hand side.
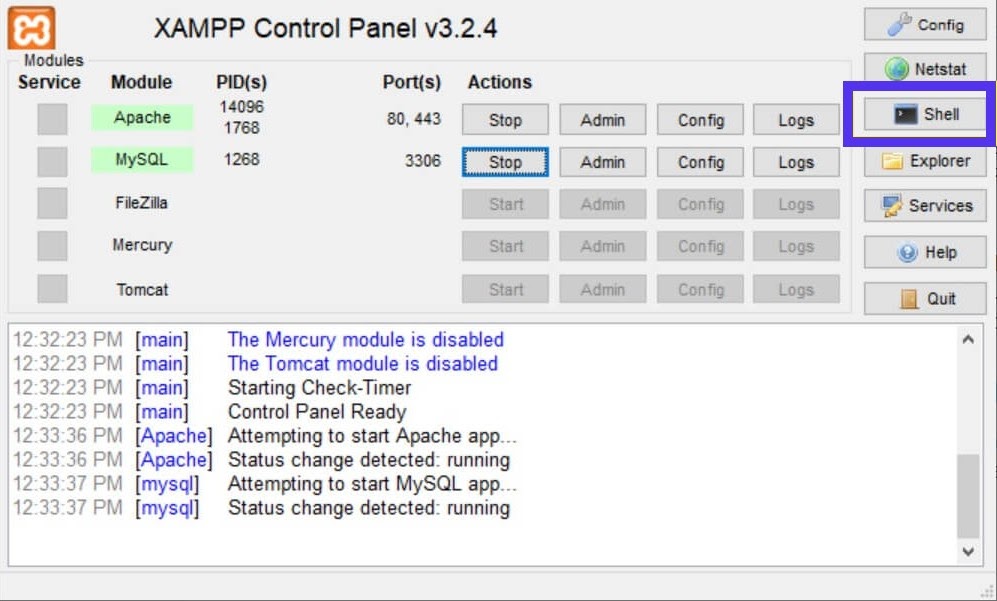
This will open up a new window with a command prompt. Enter the following command and press the Enter/Return key:
mysqladmin -u root password
The shell will prompt you to enter a new password. Press Enter/Return again, and you’ll be asked to confirm the new password.
Once you’ve done that, you’re finished and can close the shell window.
- Folder ที่เราจะวาง project เว็บไซต์อยู่ที่ path c:\xampp\htdocs ให้สร้าง folder ย่อยขึ้นมาใหม่ c:\xampp\htdocs\bookspaceworld
- เปลี่ยน database password ได้โดยไปที่ phpMyAdmin explore หรือ ที่ c:\xampp\phpMyAdmin > config.inc
- Reference: https://kinsta.com/knowledgebase/xampp-mysql....
- เปลี่ยน
max_allowed_packet โดยไปที่c:\xampp\mysql\bin ที่ file my.ini- เปลี่ยน max_allowed_packet =256M
- Import a .sql file using the command prompt in XAMPP for Windows
- เปิด Command Prompt ไปที่ folder ที่ mysql.exe อยู่ c:\xampp\mysql\bin
- พิมพ์ mysql -u {DATABASE_USERNAME} -p {DATABASE_NAME} < "path/to/file/database-to-import.sql"
วิธีการติดตั้ง Composer ดูได้จาก
https://devanswers.co/install-composer-php-windows-10/
1.ดาวน์โหลด Composer จาก https://getcomposer.org/Composer-Setup.exe

2. คลิก Next > ให้ข้าม Proxy URL settings, just click Next then click Install จนเสร็จ
3. ตรวจสอบ Environment Variables ว่า dd path php ถูกต้องไหม
- (ไปที่ advance system properties เพิ่ม path c:\xampp\php)

4. Restart เครื่อง จากนั้น Open up Command Prompt and type composer -V ถ้าสมบูรณ์จะพบ version ที่ติดตั้ง


